Artist Invoice Template: A Comprehensive Guide for Creative Professionals
As a creative professional, whether you’re a freelance graphic designer, a painter, a musician, or any other type of artist, managing your finances effectively is crucial for your long-term success. One essential tool for this is a well-structured artist invoice template. An artist invoice template not only ensures you get paid on time but also helps maintain a professional image and streamline your billing process. This comprehensive guide will walk you through everything you need to know about using and customizing an artist invoice template.
Why Use an Artist Invoice Template?
Using an artist invoice template offers numerous benefits for creative professionals:
- Professionalism: A professionally designed invoice reflects positively on your business and demonstrates your commitment to quality.
- Clarity: A clear and detailed invoice leaves no room for ambiguity, reducing the likelihood of payment disputes.
- Efficiency: An artist invoice template saves you time by eliminating the need to create invoices from scratch each time.
- Organization: Keeping track of your invoices helps you manage your finances and stay organized for tax purposes.
- Legal Protection: A well-documented invoice can serve as legal proof of your agreement with the client, protecting you in case of non-payment.
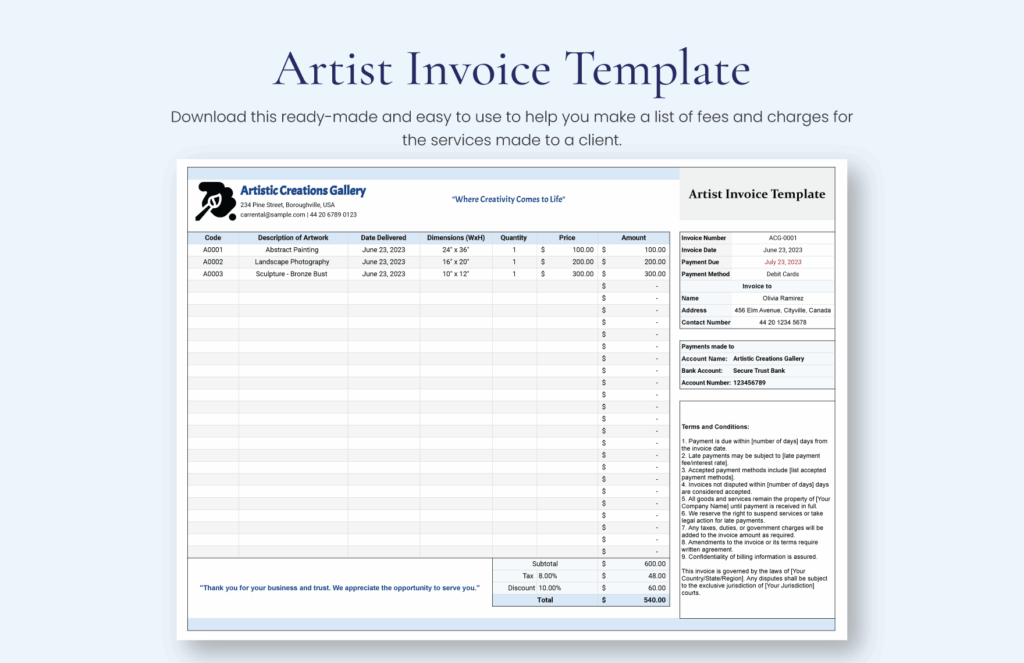
Essential Elements of an Artist Invoice Template
A comprehensive artist invoice template should include the following elements:
Your Contact Information
Start with your business name, address, phone number, and email address. This ensures your client knows who to contact if they have any questions.
Client’s Contact Information
Include the client’s name, address, and contact details. This is essential for record-keeping and ensures the invoice reaches the correct recipient.
Invoice Number
Assign a unique invoice number to each invoice. This helps you track payments and avoid confusion, especially when dealing with multiple clients. It’s also useful for accounting and tax purposes. Consider using a sequential numbering system (e.g., 2023-001, 2023-002) for easy tracking.
Invoice Date
Clearly state the date the invoice was issued. This helps the client understand when the payment is due.
Payment Due Date
Specify the date by which the payment is expected. Common payment terms include Net 30 (payment due within 30 days), Net 15 (payment due within 15 days), or upon receipt. Be clear and consistent with your payment terms.
Description of Services
Provide a detailed description of the services you provided. Be specific and include details such as the project name, the type of work done, and the hours spent. For example, instead of just saying “Graphic Design,” specify “Logo Design for Acme Corp – 10 hours.”
Hourly Rate or Project Fee
Clearly state your hourly rate or the agreed-upon project fee. If you’re charging an hourly rate, include the number of hours worked. If it’s a fixed project fee, specify the total amount.
Subtotal
Calculate the subtotal by multiplying your hourly rate by the number of hours worked or by simply stating the project fee.
Taxes (if applicable)
If you are required to charge sales tax or VAT, clearly indicate the tax rate and the amount. Ensure you comply with all local tax regulations. Consult with a tax professional if you are unsure about your tax obligations.
Discounts (if applicable)
If you offered any discounts, clearly state the discount amount and the reason for the discount. This helps maintain transparency and goodwill with your client.
Total Amount Due
Calculate the total amount due by adding the subtotal, taxes, and subtracting any discounts. Make sure this amount is clearly visible on the invoice.
Payment Instructions
Provide clear instructions on how the client can pay you. Include accepted payment methods such as bank transfer, PayPal, credit card, or check. Provide all necessary details, such as your bank account number, PayPal email address, or mailing address for checks.
Terms and Conditions
Include any relevant terms and conditions, such as late payment fees, cancellation policies, or copyright information. This protects your rights and sets clear expectations with your client.
Notes or Special Instructions
Use this section to add any additional notes or special instructions for the client. This could include a thank you message, a reminder about an upcoming deadline, or any other relevant information.
Finding the Right Artist Invoice Template
There are several options for finding the right artist invoice template:
- Online Templates: Numerous websites offer free and premium invoice templates that you can download and customize.
- Accounting Software: Many accounting software programs, such as QuickBooks, Xero, and FreshBooks, include built-in invoice templates.
- Spreadsheet Programs: You can create your own artist invoice template using spreadsheet programs like Microsoft Excel or Google Sheets.
- Design Software: Programs like Adobe InDesign can be used to create highly customized and visually appealing invoices.
Customizing Your Artist Invoice Template
Once you’ve found an artist invoice template, it’s important to customize it to reflect your brand and specific needs:
Add Your Logo
Include your logo to reinforce your brand identity. Place your logo prominently at the top of the invoice.
Use Your Brand Colors and Fonts
Use your brand’s colors and fonts to create a cohesive and professional look. Consistency in branding helps clients recognize and remember your business.
Adjust the Layout
Adjust the layout to suit your preferences and the information you need to include. Ensure the invoice is easy to read and understand.
Include a Personal Touch
Add a personal touch, such as a thank you message or a brief note, to show your appreciation for the client’s business.
Tips for Effective Invoicing
Here are some tips for effective invoicing as an artist:
- Send Invoices Promptly: Send invoices as soon as the work is completed to ensure timely payment.
- Be Clear and Concise: Make sure your invoices are clear, concise, and easy to understand.
- Follow Up on Overdue Payments: Don’t hesitate to follow up on overdue payments. Send a friendly reminder first, and if necessary, escalate the issue.
- Keep Accurate Records: Keep accurate records of all your invoices and payments for tax purposes.
- Offer Multiple Payment Options: Offering multiple payment options makes it easier for clients to pay you.
Free Artist Invoice Template Options
Many platforms offer free artist invoice template options. These are a great starting point, especially if you’re just starting out. Look for templates that are easily customizable so you can add your branding and specific details. Remember to review the terms of use for any free template to ensure it meets your business needs.
Using an Artist Invoice Template for Different Art Forms
The beauty of an artist invoice template is its adaptability. Whether you’re a photographer, illustrator, or sculptor, the core elements remain the same. However, you might tailor the ‘description of services’ section to better reflect your specific art form. For instance, a photographer might include details about the type of photoshoot, the location, and the number of edited images provided.
The Importance of Digital Invoicing
In today’s digital age, consider using digital invoicing tools. These tools often come with features like automated reminders, payment tracking, and integration with accounting software. Digital invoicing can save you time and reduce the risk of errors, making your financial management more efficient. Many digital invoicing platforms also offer mobile apps, allowing you to create and send invoices on the go.
Common Mistakes to Avoid When Using an Artist Invoice Template
Even with a great artist invoice template, it’s easy to make mistakes. Here are some common pitfalls to avoid:
- Incorrect Contact Information: Always double-check your contact information and the client’s details.
- Missing Invoice Number: Ensure each invoice has a unique invoice number.
- Vague Descriptions: Be specific and detailed in your descriptions of services.
- Incorrect Calculations: Double-check all calculations to ensure accuracy.
- Unclear Payment Terms: Clearly state your payment terms and accepted payment methods.
Advanced Features in Artist Invoice Templates
Some advanced artist invoice template options include features like recurring invoices (useful for retainer agreements), the ability to add multiple line items, and options for including images or attachments. These features can be particularly helpful for complex projects or ongoing client relationships.
Securing Your Artist Invoice Template
When using an artist invoice template, especially a digital one, security is paramount. Protect your sensitive financial information by using strong passwords, enabling two-factor authentication, and regularly backing up your data. Be cautious of phishing scams and never share your login credentials with anyone.
The Future of Artist Invoicing
As technology evolves, the future of artist invoicing will likely involve increased automation, integration with blockchain technology for secure transactions, and the use of AI to predict payment patterns and optimize cash flow. Staying informed about these trends can help you stay ahead of the curve and manage your finances more effectively.
Conclusion
Using an artist invoice template is essential for managing your finances, maintaining a professional image, and ensuring you get paid on time. By following the tips and guidelines outlined in this comprehensive guide, you can create effective invoices that streamline your billing process and protect your business. An artist invoice template is more than just a form; it’s a tool that empowers you to take control of your financial future and focus on what you do best: creating art. Remember to regularly review and update your artist invoice template to ensure it meets your evolving needs and complies with all relevant regulations. A well-crafted artist invoice template will save you time, reduce errors, and ultimately contribute to the success of your artistic endeavors. [See also: Freelance Invoice Best Practices] [See also: How to Price Your Art] [See also: Managing Finances as a Freelancer]
